


Creamy Green Pasta Recipe Made in One Pot
### The Emergence of TikTok Pasta and Fast Recipes
In the last few years, social media platforms such as TikTok have transformed the way we find and share recipes. A viral phenomenon that has enchanted the hearts (and appetites) of many is the “TikTok pasta,” which consists of a wonderful mix of baked feta cheese and cherry tomatoes, mashed into a creamy sauce that perfectly envelops your preferred pasta. This dish not only demonstrates the influence of social media on cooking trends but also emphasizes the joy of cooking together as a family.
#### A Touching Cooking Journey
Observing a child take charge in the kitchen can be one of the most fulfilling moments for a parent. Recently, Elsa crafted the TikTok pasta entirely on her own, creating a moment brimming with pride and happiness. This experience reminds us that at times, the impact of social media can excel beyond conventional teaching techniques, as children become motivated by the engaging and visually stimulating content they find online.
#### The Charm of Quick and Simple Pasta Recipes
The popularity of quick and simple pasta recipes is clear, catering to hectic lifestyles while still producing delectable results. Apart from the viral TikTok pasta, there are countless other easy pasta dishes that can be prepared in no time. One such recipe features kale, making it an ideal choice for lunch, particularly when aiming to incorporate some greens.
#### Creamy Kale Pasta Recipe
This creamy kale pasta meal can be made in less than 15 minutes and requires few ingredients and minimal kitchen tools. Here’s how to prepare it:
**Ingredients:**
– Bucatini pasta (or your choice of pasta)
– Fresh kale
– Olive oil
– Garlic
– Parmesan cheese
– Salt and pepper
– Optional: nuts or seeds for extra texture
**Instructions:**
1. **Cook the Pasta:** Start by boiling water in a big pot. Add the bucatini pasta and cook according to the packaging directions.
2. **Soften the Kale:** In the last minute of cooking the pasta, add the kale to the pot. This will tenderize the kale and infuse the pasta water with flavor.
3. **Blend the Sauce:** Save a cup of pasta water, then drain the pasta and kale. In a blender, mix the cooked kale, olive oil, garlic, Parmesan cheese, and a splash of the saved pasta water. Blend until smooth, adjusting the thickness with additional pasta water if needed.
4. **Combine:** Mix the pasta with half of the kale sauce, ensuring it’s evenly covered. Serve the remaining sauce at the bottom of the dishes for an impressive presentation.
5. **Garnish:** Finish with extra Parmesan cheese, nuts, or seeds for added crunch.
This meal not only looks stunning but also provides a creamy texture that is sure to delight. The use of bucatini, with its thicker and hollow shape, allows it to absorb the sauce wonderfully, enhancing the overall taste.
#### Join the Cookalong
For those eager to try this recipe, a cookalong event will be hosted on Instagram stories. Participants are encouraged to gather the ingredients and join in on the fun. Sharing your adaptations on social media and tagging the host can foster a sense of community and inspire others to attempt this delightful meal.
In summary, the effect of platforms like TikTok on culinary trends is unmistakable. Quick and convenient recipes not only make cooking more accessible but also promote family togetherness in the kitchen. So, whether you’re motivated by viral trends or classic cookbooks, there’s always a chance for creativity and enjoyment in cooking.

Orange, Date, and Avocado Salad Recipe for Ample Affection April
### Celebrating Citrus: A Delightful Salad Recipe for Easter
With the Easter holiday on the horizon, many seek fresh and lively dishes to honor the season. This year, while soaking in the tranquil beauty of the Stockholm Archipelago, we aim to share a delightful citrus salad recipe showcasing the final citrus fruits before they disappear from the market. This salad is not only eye-catching but also brimming with flavor and nutrition.
#### The Delight of Citrus Salads
Citrus fruits, including oranges, grapefruits, and mandarins, infuse a refreshing zest into any meal. Their vibrant colors and tangy tastes complement a wide range of ingredients, making them ideal for salads. This specific recipe merges citrus with creamy avocado, crunchy hazelnuts, and sweet dates, creating a harmonious blend of flavors and textures.
#### Ingredients
– Variety of citrus fruits (oranges, grapefruits, etc.)
– 1 ripe avocado
– Handful of toasted hazelnuts
– A couple of Medjool dates, pitted and finely chopped
– Extra virgin olive oil
– Salt and pepper, to your preference
– Bread (for absorbing the juices)
#### Instructions
1. **Prepare the Citrus**: Peel and segment the citrus fruits, discarding any seeds. Place the segments on a serving platter.
2. **Slice the Avocado**: Halve the avocado, take out the pit, and scoop out the flesh. Cut it into thin slices and add it to the platter.
3. **Add the Crunch**: Sprinkle the toasted hazelnuts and chopped dates over the citrus and avocado.
4. **Dress the Salad**: Drizzle extra virgin olive oil over the salad. Season it with salt and pepper to your liking.
5. **Serve with Bread**: Present slices of bread alongside to soak up the delicious juices from the salad.
#### Why This Salad Works
The combination of bitter greens and the sweetness of citrus creates a delightful contrast. The creamy avocado adds depth, while the hazelnuts contribute a satisfying crunch. The dates offer a natural sweetness that enhances the tangy citrus, ensuring each bite is a flavor explosion.
#### Ideal for Easter
This citrus salad not only pleases the eye but also serves as a nutritious addition to your Easter feast. It can be enjoyed as a refreshing appetizer or as a side dish to accompany your main course. Pair it with soups, pies, or even chocolate desserts for a well-rounded meal.
#### Conclusion
As you gather with your loved ones this Easter, think about incorporating this vibrant citrus salad into your menu. It’s a straightforward yet sophisticated dish that celebrates the tastes of the season. Relish the freshness of citrus while it lasts, and let this salad be a star of your holiday spread!

Lemon, Polenta, and Ricotta Cake Instructions
### Thrilling Life Transitions and a Yummy Cake Recipe
Life is filled with changes, and for one family, their adventure is leading them from Sweden to Denmark. Luise has taken the leap to fulfill a lifelong aspiration of studying midwifery in Copenhagen, motivating the whole family to shift to a delightful home just outside the city. This transition signifies not merely a new residence but also a considerable alteration in their lives, particularly for their children, who are facing the intricacies of a new school and surroundings.
#### The Transition to Denmark
After spending 12 years in Sweden, the family is excited yet nervous about their fresh journey. The conversation about where to reside has consistently been a part of their dual-nationality household, and now they are prepared to welcome Denmark. The children are thrilled about having a home with a trampoline and being nearer to their grandmother, though they are also grappling with the adjustments that accompany relocating to a different country.
For families contemplating a comparable move, it’s crucial to anticipate the emotional and logistical hurdles. Insights from those who have adeptly mastered this transition can be priceless. Connecting with local communities, previewing schools ahead of time, and fostering open dialogue with children regarding their emotions can assist in easing the shift.
#### Pursuing Passion Projects
In spite of the upheaval, the family will persist with their endeavors at Green Kitchen Stories (GKS). Luise will juggle her studies alongside continuing projects, including the creation of a new collection of tattoos and the production enterprise, Green Kitchen Studios. They are also eager about an upcoming book slated for release next Spring, although the title is currently kept under wraps.
Moreover, they have introduced a vegan supplement range in partnership with Puori, aimed at developing and broadening their product selection. Following a short supply issue, their protein powder is available once more, and to commemorate this, they are providing a 20% discount throughout May. This offer is an excellent chance for those eager to try their favorite items, like the B12 Berry Booster.
#### The Cake Recipe
In the midst of the excitement of relocating and ongoing projects, the family presents a delightful cake recipe. This cake takes inspiration from a polenta cake featured in their book, “Green Kitchen Travels,” yet has been modified to increase its moisture and transform it into an upside-down cake adorned with lovely lemon slices and a lemon honey syrup.
This cake uniquely combines Italian cheesecake and a tender crumb cake, infused with the essence of polenta and poppy seeds. Remarkably moist yet airy, it is naturally gluten-free and sweetened exclusively with honey, providing floral undertones that enhance its rich taste. The inclusion of ricotta cheese boosts the cake’s flavor, making it even more enjoyable after a day in the refrigerator.
#### Conclusion
As the family gets ready for their new chapter in Denmark, they are enthusiastic about the forthcoming changes while simultaneously cherishing their ongoing projects and sharing scrumptious recipes. The cake acts as a sweet reminder of the joys that accompany new beginnings and the significance of family and community during transitions.

Seasonal Dish: Zucchini Soup Influenced by Summer Love
### Zucchini Soup: A Nourishing and Refreshing Treat
Zucchini soup is a flexible and nutritious dish suitable for any time of the year. This velvety soup is not just tasty but also loaded with nutrients, making it an excellent option for a light lunch or dinner. Below, we delve into the ingredients, cooking process, and some serving ideas to enhance your zucchini soup experience.
#### Ingredients
– **2 tbsp olive oil**: A beneficial fat that imparts flavor and aids in sautéing the vegetables.
– **1 yellow onion**: Offers a sweet foundational flavor during cooking.
– **1 celery stalk**: Contributes a slight earthiness and crunch.
– **1-2 cloves garlic**: Improves the overall flavor profile with its aromatic qualities.
– **1 large or 2 smaller zucchini (courgette)**: The main ingredient, providing a mild taste and creamy texture when pureed.
– **A generous handful of fresh spinach**: Increases nutritional value with vitamins and minerals.
– **120 ml / 1/2 cup white wine**: Introduces depth and richness to the soup.
– **500 ml / 2 cups vegetable stock**: The liquid foundation that harmonizes all the flavors.
– **120 ml / 1/2 cup cream or coconut cream**: Adds richness and a creamy quality to the soup.
– **A handful of fresh herbs (dill and mint suggested, but basil is also a good choice)**: Fresh herbs brighten the dish and provide aromatic notes.
– **1 lemon**: The juice adds tartness, balancing the flavors.
– **Salt & black pepper**: Crucial seasonings to elevate taste.
#### Toppings
– **1 cup cooked quinoa**: Contributes protein and a nutty flavor.
– **Sour cream or smetana**: A creamy garnish that complements the soup.
– **Dill**: Fresh dill enhances the herbal notes.
– **Red onion or chives, finely chopped**: Adds a crunchy texture and sharpness.
#### Preparation Steps
1. **Sauté the Aromatics**: In a large pot, warm the olive oil over medium heat. Add the chopped yellow onion and celery, cooking until softened. Incorporate the minced garlic and cook for an extra minute until aromatic.
2. **Cook the Zucchini**: Dice the zucchini into bite-sized pieces and add it to the pot. Sauté for several minutes until it starts to soften.
3. **Add Spinach and Wine**: Mix in the fresh spinach and pour in the white wine. Let the mixture simmer for a few minutes until the wine has slightly reduced.
4. **Combine with Stock**: Add the vegetable stock and bring the mixture to a boil. Lower the heat and let it simmer for approximately 10-15 minutes, or until the zucchini is tender.
5. **Blend the Soup**: Using an immersion blender, blend the soup until smooth. Alternatively, transfer the soup in batches to a countertop blender.
6. **Finish with Cream and Herbs**: Return the blended soup to the pot, stir in the cream or coconut cream, and include the fresh herbs. Squeeze in the lemon juice and season with salt and black pepper to taste. Heat gently until warmed through.
7. **Serve**: Portion the soup into bowls and top with cooked quinoa, a dollop of sour cream or smetana, fresh dill, and chopped red onion or chives.
#### Conclusion
Zucchini soup is not only straightforward to make but also a wonderful means to include more vegetables in your diet. Its creamy consistency and fresh flavors create a comforting dish that can be enjoyed solo or alongside crusty bread. Experiment with various herbs and toppings to personalize this soup, and savor the health benefits it offers.


Creamy Green Pasta Recipe Made in One Pot
### The Emergence of TikTok Pasta and Fast Recipes
In the last few years, social media platforms such as TikTok have transformed the way we find and share recipes. A viral phenomenon that has enchanted the hearts (and appetites) of many is the “TikTok pasta,” which consists of a wonderful mix of baked feta cheese and cherry tomatoes, mashed into a creamy sauce that perfectly envelops your preferred pasta. This dish not only demonstrates the influence of social media on cooking trends but also emphasizes the joy of cooking together as a family.
#### A Touching Cooking Journey
Observing a child take charge in the kitchen can be one of the most fulfilling moments for a parent. Recently, Elsa crafted the TikTok pasta entirely on her own, creating a moment brimming with pride and happiness. This experience reminds us that at times, the impact of social media can excel beyond conventional teaching techniques, as children become motivated by the engaging and visually stimulating content they find online.
#### The Charm of Quick and Simple Pasta Recipes
The popularity of quick and simple pasta recipes is clear, catering to hectic lifestyles while still producing delectable results. Apart from the viral TikTok pasta, there are countless other easy pasta dishes that can be prepared in no time. One such recipe features kale, making it an ideal choice for lunch, particularly when aiming to incorporate some greens.
#### Creamy Kale Pasta Recipe
This creamy kale pasta meal can be made in less than 15 minutes and requires few ingredients and minimal kitchen tools. Here’s how to prepare it:
**Ingredients:**
– Bucatini pasta (or your choice of pasta)
– Fresh kale
– Olive oil
– Garlic
– Parmesan cheese
– Salt and pepper
– Optional: nuts or seeds for extra texture
**Instructions:**
1. **Cook the Pasta:** Start by boiling water in a big pot. Add the bucatini pasta and cook according to the packaging directions.
2. **Soften the Kale:** In the last minute of cooking the pasta, add the kale to the pot. This will tenderize the kale and infuse the pasta water with flavor.
3. **Blend the Sauce:** Save a cup of pasta water, then drain the pasta and kale. In a blender, mix the cooked kale, olive oil, garlic, Parmesan cheese, and a splash of the saved pasta water. Blend until smooth, adjusting the thickness with additional pasta water if needed.
4. **Combine:** Mix the pasta with half of the kale sauce, ensuring it’s evenly covered. Serve the remaining sauce at the bottom of the dishes for an impressive presentation.
5. **Garnish:** Finish with extra Parmesan cheese, nuts, or seeds for added crunch.
This meal not only looks stunning but also provides a creamy texture that is sure to delight. The use of bucatini, with its thicker and hollow shape, allows it to absorb the sauce wonderfully, enhancing the overall taste.
#### Join the Cookalong
For those eager to try this recipe, a cookalong event will be hosted on Instagram stories. Participants are encouraged to gather the ingredients and join in on the fun. Sharing your adaptations on social media and tagging the host can foster a sense of community and inspire others to attempt this delightful meal.
In summary, the effect of platforms like TikTok on culinary trends is unmistakable. Quick and convenient recipes not only make cooking more accessible but also promote family togetherness in the kitchen. So, whether you’re motivated by viral trends or classic cookbooks, there’s always a chance for creativity and enjoyment in cooking.
Read More
Orange, Date, and Avocado Salad Recipe for Ample Affection April
### Celebrating Citrus: A Delightful Salad Recipe for Easter
With the Easter holiday on the horizon, many seek fresh and lively dishes to honor the season. This year, while soaking in the tranquil beauty of the Stockholm Archipelago, we aim to share a delightful citrus salad recipe showcasing the final citrus fruits before they disappear from the market. This salad is not only eye-catching but also brimming with flavor and nutrition.
#### The Delight of Citrus Salads
Citrus fruits, including oranges, grapefruits, and mandarins, infuse a refreshing zest into any meal. Their vibrant colors and tangy tastes complement a wide range of ingredients, making them ideal for salads. This specific recipe merges citrus with creamy avocado, crunchy hazelnuts, and sweet dates, creating a harmonious blend of flavors and textures.
#### Ingredients
– Variety of citrus fruits (oranges, grapefruits, etc.)
– 1 ripe avocado
– Handful of toasted hazelnuts
– A couple of Medjool dates, pitted and finely chopped
– Extra virgin olive oil
– Salt and pepper, to your preference
– Bread (for absorbing the juices)
#### Instructions
1. **Prepare the Citrus**: Peel and segment the citrus fruits, discarding any seeds. Place the segments on a serving platter.
2. **Slice the Avocado**: Halve the avocado, take out the pit, and scoop out the flesh. Cut it into thin slices and add it to the platter.
3. **Add the Crunch**: Sprinkle the toasted hazelnuts and chopped dates over the citrus and avocado.
4. **Dress the Salad**: Drizzle extra virgin olive oil over the salad. Season it with salt and pepper to your liking.
5. **Serve with Bread**: Present slices of bread alongside to soak up the delicious juices from the salad.
#### Why This Salad Works
The combination of bitter greens and the sweetness of citrus creates a delightful contrast. The creamy avocado adds depth, while the hazelnuts contribute a satisfying crunch. The dates offer a natural sweetness that enhances the tangy citrus, ensuring each bite is a flavor explosion.
#### Ideal for Easter
This citrus salad not only pleases the eye but also serves as a nutritious addition to your Easter feast. It can be enjoyed as a refreshing appetizer or as a side dish to accompany your main course. Pair it with soups, pies, or even chocolate desserts for a well-rounded meal.
#### Conclusion
As you gather with your loved ones this Easter, think about incorporating this vibrant citrus salad into your menu. It’s a straightforward yet sophisticated dish that celebrates the tastes of the season. Relish the freshness of citrus while it lasts, and let this salad be a star of your holiday spread!
Read More
Lemon, Polenta, and Ricotta Cake Instructions
### Thrilling Life Transitions and a Yummy Cake Recipe
Life is filled with changes, and for one family, their adventure is leading them from Sweden to Denmark. Luise has taken the leap to fulfill a lifelong aspiration of studying midwifery in Copenhagen, motivating the whole family to shift to a delightful home just outside the city. This transition signifies not merely a new residence but also a considerable alteration in their lives, particularly for their children, who are facing the intricacies of a new school and surroundings.
#### The Transition to Denmark
After spending 12 years in Sweden, the family is excited yet nervous about their fresh journey. The conversation about where to reside has consistently been a part of their dual-nationality household, and now they are prepared to welcome Denmark. The children are thrilled about having a home with a trampoline and being nearer to their grandmother, though they are also grappling with the adjustments that accompany relocating to a different country.
For families contemplating a comparable move, it’s crucial to anticipate the emotional and logistical hurdles. Insights from those who have adeptly mastered this transition can be priceless. Connecting with local communities, previewing schools ahead of time, and fostering open dialogue with children regarding their emotions can assist in easing the shift.
#### Pursuing Passion Projects
In spite of the upheaval, the family will persist with their endeavors at Green Kitchen Stories (GKS). Luise will juggle her studies alongside continuing projects, including the creation of a new collection of tattoos and the production enterprise, Green Kitchen Studios. They are also eager about an upcoming book slated for release next Spring, although the title is currently kept under wraps.
Moreover, they have introduced a vegan supplement range in partnership with Puori, aimed at developing and broadening their product selection. Following a short supply issue, their protein powder is available once more, and to commemorate this, they are providing a 20% discount throughout May. This offer is an excellent chance for those eager to try their favorite items, like the B12 Berry Booster.
#### The Cake Recipe
In the midst of the excitement of relocating and ongoing projects, the family presents a delightful cake recipe. This cake takes inspiration from a polenta cake featured in their book, “Green Kitchen Travels,” yet has been modified to increase its moisture and transform it into an upside-down cake adorned with lovely lemon slices and a lemon honey syrup.
This cake uniquely combines Italian cheesecake and a tender crumb cake, infused with the essence of polenta and poppy seeds. Remarkably moist yet airy, it is naturally gluten-free and sweetened exclusively with honey, providing floral undertones that enhance its rich taste. The inclusion of ricotta cheese boosts the cake’s flavor, making it even more enjoyable after a day in the refrigerator.
#### Conclusion
As the family gets ready for their new chapter in Denmark, they are enthusiastic about the forthcoming changes while simultaneously cherishing their ongoing projects and sharing scrumptious recipes. The cake acts as a sweet reminder of the joys that accompany new beginnings and the significance of family and community during transitions.
Read More
Seasonal Dish: Zucchini Soup Influenced by Summer Love
### Zucchini Soup: A Nourishing and Refreshing Treat
Zucchini soup is a flexible and nutritious dish suitable for any time of the year. This velvety soup is not just tasty but also loaded with nutrients, making it an excellent option for a light lunch or dinner. Below, we delve into the ingredients, cooking process, and some serving ideas to enhance your zucchini soup experience.
#### Ingredients
– **2 tbsp olive oil**: A beneficial fat that imparts flavor and aids in sautéing the vegetables.
– **1 yellow onion**: Offers a sweet foundational flavor during cooking.
– **1 celery stalk**: Contributes a slight earthiness and crunch.
– **1-2 cloves garlic**: Improves the overall flavor profile with its aromatic qualities.
– **1 large or 2 smaller zucchini (courgette)**: The main ingredient, providing a mild taste and creamy texture when pureed.
– **A generous handful of fresh spinach**: Increases nutritional value with vitamins and minerals.
– **120 ml / 1/2 cup white wine**: Introduces depth and richness to the soup.
– **500 ml / 2 cups vegetable stock**: The liquid foundation that harmonizes all the flavors.
– **120 ml / 1/2 cup cream or coconut cream**: Adds richness and a creamy quality to the soup.
– **A handful of fresh herbs (dill and mint suggested, but basil is also a good choice)**: Fresh herbs brighten the dish and provide aromatic notes.
– **1 lemon**: The juice adds tartness, balancing the flavors.
– **Salt & black pepper**: Crucial seasonings to elevate taste.
#### Toppings
– **1 cup cooked quinoa**: Contributes protein and a nutty flavor.
– **Sour cream or smetana**: A creamy garnish that complements the soup.
– **Dill**: Fresh dill enhances the herbal notes.
– **Red onion or chives, finely chopped**: Adds a crunchy texture and sharpness.
#### Preparation Steps
1. **Sauté the Aromatics**: In a large pot, warm the olive oil over medium heat. Add the chopped yellow onion and celery, cooking until softened. Incorporate the minced garlic and cook for an extra minute until aromatic.
2. **Cook the Zucchini**: Dice the zucchini into bite-sized pieces and add it to the pot. Sauté for several minutes until it starts to soften.
3. **Add Spinach and Wine**: Mix in the fresh spinach and pour in the white wine. Let the mixture simmer for a few minutes until the wine has slightly reduced.
4. **Combine with Stock**: Add the vegetable stock and bring the mixture to a boil. Lower the heat and let it simmer for approximately 10-15 minutes, or until the zucchini is tender.
5. **Blend the Soup**: Using an immersion blender, blend the soup until smooth. Alternatively, transfer the soup in batches to a countertop blender.
6. **Finish with Cream and Herbs**: Return the blended soup to the pot, stir in the cream or coconut cream, and include the fresh herbs. Squeeze in the lemon juice and season with salt and black pepper to taste. Heat gently until warmed through.
7. **Serve**: Portion the soup into bowls and top with cooked quinoa, a dollop of sour cream or smetana, fresh dill, and chopped red onion or chives.
#### Conclusion
Zucchini soup is not only straightforward to make but also a wonderful means to include more vegetables in your diet. Its creamy consistency and fresh flavors create a comforting dish that can be enjoyed solo or alongside crusty bread. Experiment with various herbs and toppings to personalize this soup, and savor the health benefits it offers.
Read More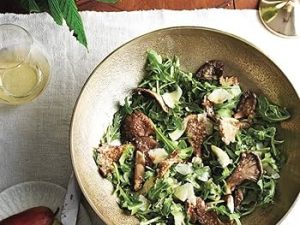
Vegan Caesar Salad featuring Oyster Mushrooms
### Vegan Caesar Salad with Sear-Crisped Mushrooms
As summer gives way to autumn, it becomes an ideal moment to delve into fresh and innovative recipes. This article introduces a delightful vegan reinterpretation of the classic Caesar salad, featuring a distinctive method of preparing mushrooms that takes the dish to elevated levels.
#### A New Home and New Recipes
Following a substantial relocation to Denmark, the recipe creators, David and Luise, are acclimating to their new environment while continuing to share their enthusiasm for plant-based cuisine. With Luise immersed in her midwife internship and David launching a Green Kitchen Studio in Copenhagen, they are navigating the upheaval of change while presenting appetizing vegan recipes to their followers.
#### The Star of the Dish: Sear-Crisped Mushrooms
The centerpiece of this recipe is the mushrooms, which are cooked using an inventive approach that involves compressing them between two pans on medium-high heat. This technique enables the mushrooms to release their inherent juices while achieving a delightfully crunchy crust. The method, attributed to Derek Sarno, produces mushrooms that are both crispy and succulent, evoking the texture of chicken.
To prepare the mushrooms:
1. Heat two pans on medium-high heat.
2. Place the mushrooms between the pans and apply pressure.
3. Cook until they attain a golden, crispy exterior.
4. Marinate the mushrooms to enhance their flavor.
This preparation not only improves the mushrooms’ texture but also makes them a key element of the salad.
#### The Vegan Caesar Dressing
Instead of the conventional Caesar dressing, which commonly contains anchovies, this recipe features a straightforward yet tasty vegan substitute. The dressing includes:
– Vegan mayonnaise
– A dash of vinegar
– Capers for a tangy punch
This blend results in a creamy dressing that perfectly complements the crisp romaine lettuce.
#### Assembling the Salad
To put together the vegan Caesar salad:
1. Toss fresh romaine lettuce with the vegan dressing until well coated.
2. Top with the sear-crisped mushrooms.
3. For extra texture and nutrition, warm chickpeas can be added in lieu of croutons.
This salad is not only visually stunning but also brimming with flavor and nutrients, making it a fulfilling meal.
#### Conclusion
This vegan Caesar salad with sear-crisped mushrooms exemplifies the adaptability of plant-based cooking. It’s a dish that highlights the remarkable texture and flavor of mushrooms while offering a fresh perspective on a cherished classic. Whether you seek a quick lunch or a side dish for dinner, this salad is guaranteed to impress. Try it out and share your thoughts on this scrumptious meal!
Read More
How to Create the Ideal Berry Smoothie
Alex & Sonja: The Culinary Team Behind A Couple Cooks
Introducing Alex and Sonja Overhiser, the energetic pair who have turned their love for cooking into a flourishing online culinary hub. As authors of two well-received cookbooks and the creators of the beloved website A Couple Cooks, Alex and Sonja have been expressing their passion for straightforward, seasonal recipes since 2010. Their adventure began with a mutual desire to whip up delightful meals and has developed into an extensive platform featuring thousands of unique recipes, cooking tips, and meal planning suggestions.
Their cooking philosophy is firmly anchored in the pleasure of preparing meals side by side. As busy parents, they recognize the difficulties of juggling family obligations with culinary innovation. This real-life couple not only cooks together but also works collaboratively on all facets of their website, from writing to photography, ensuring that each recipe is thoughtfully developed and visually striking. Their recipes undergo testing not just by them but also by their children, adding an extra dimension of authenticity and family-friendliness to their offerings.
The A Couple Cooks website showcases Alex and Sonja’s dedication to making cooking attainable and enjoyable for all. They emphasize the use of fresh, seasonal ingredients to craft dishes that are both healthy and flavorful. Their recipe selection spans from quick weeknight meals to grand weekend celebrations, appealing to a diverse array of tastes and dietary requirements.
Alongside their vast recipe archive, Alex and Sonja share useful cooking tips and meal planning ideas, assisting home cooks in optimizing their kitchen practices and maximizing their time and ingredients. Their knowledge and friendly approach have built a devoted readership that values their practical guidance and motivating culinary innovations.
Through their cookbooks and digital presence, Alex and Sonja Overhiser continue to encourage others to relish the joy of cooking, one recipe at a time. Whether you are an experienced chef or a beginner in the kitchen, A Couple Cooks provides a treasure trove of resources to help you uncover the joys of preparing and sharing delectable meals with family and friends.
Read More
Sweet Potato Shakshuka: A Wholesome Variation of the Traditional Recipe
### Sweet Potato and Egg Skillet with Sriracha Butter
**Introduction**
This charming recipe, taken from *Ottolenghi Test Kitchen: Shelf Love* by Noor Murad and Yotam Ottolenghi, merges the natural sweetness of roasted sweet potatoes with the luxuriousness of eggs and a spicy flair from sriracha butter. Ideal for a cozy brunch or a fulfilling dinner, this dish offers both comfort and taste.
**Ingredients**
– Sweet potatoes
– Olive oil
– Cheddar cheese
– Garlic
– Cumin
– Eggs
– Butter
– Sriracha
– Onion
– Lemon juice
– Fresh coriander
– Salt and pepper
**Instructions**
1. **Prepare the Sweet Potatoes**: Preheat your oven to 200°C (400°F fan). Prick the sweet potatoes with a fork around 8–10 times and arrange them on a parchment-lined baking sheet. Bake for 45–50 minutes until fully cooked and soft. Once finished, allow them to cool and lower the oven temperature to 180°C fan (375°F).
2. **Pickle the Onions**: In a small bowl, mix the chopped onion with 1 tablespoon of lemon juice and a pinch of salt. Set this blend aside to pickle while you prep the remainder of the dish.
3. **Prepare the Potato Skins**: After the sweet potatoes have cooled, peel the skins and break them into approximately 4 cm pieces. Place the flesh in a large bowl. Return the skins to the baking sheet, toss them with 1 tablespoon of oil, 1/4 teaspoon of salt, and a good grind of pepper. Bake for about 8 minutes until they are nicely colored and beginning to crisp up. Set aside to cool.
4. **Mash the Potato Flesh**: Use a fork to mash the sweet potato flesh until it is smooth. Incorporate the cheddar cheese, minced garlic, cumin, another tablespoon of oil, the remaining tablespoon of lemon juice, 1 teaspoon of salt, and a generous grind of pepper. Stir until well combined.
5. **Cook the Potato Mixture**: Heat 1 tablespoon of oil in a large frying pan with a lid over medium-high heat. Spoon the mashed potato mixture into the pan, spreading it out evenly. Cook for about 7 minutes until the bottom begins to color. Lower the heat to medium and create eight wells in the potato mixture, cracking an egg into each well. Lightly sprinkle with salt and pepper, cover with the lid, and cook for 4–5 minutes, rotating the pan occasionally, until the egg whites are set but the yolks stay runny.
6. **Make the Sriracha Butter**: In a small saucepan, combine the butter and sriracha over medium heat. Whisk continuously until the butter melts and the mixture emulsifies. Remove from heat before it starts to bubble to avoid splitting.
7. **Serve**: Once the eggs are cooked, drizzle the sriracha butter over them. Finish with a generous handful of crispy potato skins, half of the pickled onions, and all the fresh coriander leaves. Serve immediately, alongside the extra potato skins and pickled onions.
**Conclusion**
This Sweet Potato and Egg Skillet with Sriracha Butter exemplifies how simple ingredients can coalesce to create a dish that is both appetizing and full of flavor. Savor this recipe as a comforting meal any time throughout the day!
Read More
Double Chocolate and Buckwheat Biscuits Recipe by Aran
### Vegan Chocolate Fennel Cookies Recipe
This plant-based version of Aran Goyoaga’s classic chocolate fennel cookie recipe presents a charming spin on conventional baking. By replacing eggs with aquafaba and butter with coconut oil, these cookies preserve their luscious taste while being completely vegan. Here’s a guide to crafting these mouthwatering delights.
#### Ingredients
– 6 tablespoons aquafaba (whipped)
– 7 ounces (200 g) dark chocolate (dairy-free)
– 1/4 cup almond butter
– 1/4 cup coconut oil (melted)
– 3/4 cup brown sugar
– 1 teaspoon vanilla extract
– 1 cup buckwheat flour
– 1/4 cup cocoa powder
– 1/2 teaspoon baking soda
– 1/4 teaspoon salt
– 1 ounce (25 g) dark chocolate (for topping)
– 1 teaspoon fennel seeds (crushed)
#### Instructions
1. **Preheat the Oven**: Set your oven to 375 degrees F (190 degrees C). Line two baking trays with parchment paper.
2. **Prepare Fennel**: Grind the fennel seeds into a powder using a mortar and pestle or a clean coffee grinder.
3. **Melt Chocolate Mixture**: In a medium pot, fill it one-quarter with water and bring it to a gentle simmer over medium-high heat. In a large heat-safe bowl, combine the crushed fennel, 7 ounces of dark chocolate, almond butter, and melted coconut oil. Set the bowl over the simmering water and stir until the chocolate is almost melted. Remove from heat; the remaining heat will complete the melting of the chocolate.
4. **Mix Aquafaba and Sugar**: In the bowl of a stand mixer fitted with the whisk attachment, blend the whipped aquafaba, brown sugar, and vanilla extract. Beat on high until the mixture is light and thick, approximately 5 minutes. Then, add the melted chocolate mixture and mix on medium speed until thick, around 1 minute.
5. **Combine Dry Ingredients**: In a small bowl, whisk together the buckwheat flour, cocoa powder, baking soda, and salt. Gently fold this dry mix into the wet batter with a spatula.
6. **Shape Cookies**: Drop 1½-tablespoon mounds of dough onto each prepared baking tray, ensuring about 2 inches of space between each mound. Lightly press small pieces of the remaining dark chocolate on top of each cookie.
7. **Bake**: Bake in the preheated oven for 8 to 9 minutes, until the edges are crispy but the centers remain soft. Be careful not to overbake; they may seem slightly underbaked but will firm up as they cool.
8. **Cool and Store**: Let the cookies cool on the pan for about 10 minutes or until they can be lifted without crumbling. Store the cookies in an airtight container, where they will remain fresh for up to 3 days.
These vegan chocolate fennel cookies are a wonderful combination of rich chocolate and fragrant fennel, adding a distinctive touch to your baking collection. Savor the delightful flavors while enjoying a guilt-free indulgence!
Read More
Saffron and Millet Salad for Winter Festivities
### Roasted Root Vegetable and Millet Salad with Pomegranate
This colorful and wholesome vegan recipe merges the robust flavors of roasted root vegetables with the chewy texture of millet, garnished with fresh herbs and pomegranate seeds for a splash of color and taste. Ideal as a main dish or a substantial side, this salad is both delightful and eye-catching.
#### Ingredients
– Variety of root vegetables (carrots, parsnips, sweet potatoes, etc.)
– Olive oil
– Ground cinnamon
– Salt
– Pecan nuts
– Millet
– Water
– Vegetable broth
– Saffron
– Pink Castel Franco lettuce (or any preferred lettuce)
– Fresh dill and mint
– Pomegranate seeds
#### Instructions
1. **Preheat the Oven**: Start by setting your oven to 400°F (200°C).
2. **Prepare the Root Vegetables**: Peel and chop your selected root vegetables into chunks.
3. **Season and Bake**: Arrange the vegetable chunks on a baking tray lined with parchment paper. Drizzle with olive oil, season with cinnamon and salt, then toss to coat evenly. Roast in the preheated oven for 15 to 20 minutes, or until the vegetables are tender, golden, and the edges are slightly crispy.
4. **Roast the Nuts**: In the final moments of baking, add the pecan nuts to the tray to roast with the root vegetables, enhancing their flavor and crunch.
5. **Cook the Millet**: As the vegetables roast, prepare the millet. In a saucepan, combine millet, water, vegetable broth, and saffron. Bring it to a boil, then reduce the heat and let it simmer for 8 minutes. After cooking, turn off the heat, cover the pot, and allow it to sit for approximately 10 minutes to help the millet fluff.
6. **Assemble the Salad**: Once the millet is done, move it to a serving platter and let it cool slightly. Remove the roasted vegetables and nuts from the oven and let them cool for a few moments.
7. **Prepare the Dressing**: In a small bowl, combine your selected dressing ingredients (such as olive oil, lemon juice, and herbs) and drizzle over the roasted roots.
8. **Combine Ingredients**: Halve the pink Castel Franco lettuce and gently mix it into the cooled millet. Incorporate the roasted roots and pecans into the mixture.
9. **Garnish**: Sprinkle the chopped dill and mint over the salad, followed by a generous scattering of pomegranate seeds for a refreshing crunch and sweetness.
10. **Serve**: This dish can be enjoyed warm or at room temperature. For those adding a creamy touch, crumbled feta cheese can be sprinkled on top, though it is completely optional for a vegan version.
Savor this delightful and nutritious roasted root vegetable and millet salad as a wholesome meal that highlights the seasonal flavors!
Read More